1 – Introduction
Below, user will find the documentation on using the SmartDisk II
2 – Usage precautions
For best usage experience and to keep your SmartDisk II functioning, some precautions need to be followed:
- Never plug in/out your SmartDisk II while your Apple II is powered on, it may damage the SmartDisk II circuit,
- Never insert or eject the SDCard while the SmartDisk II is powered,
- Do not plug in USB with your SmartDisk II connected to the Apple II,
- Always check the IDC connection on the Apple Disk controller before turning the Apple II power on,
- SmartDisk II before rev 3 is not compatible with IIc & IIGS, a modification is needed on the PCB.
3 – SmartDisk Hardware description
A/ Apple II + / Apple IIe
You will need a Disk II controller that should be connected to your DISK II drive. It is very important to check the side of the 20 pins ribbon before connecting the SmartDisk II.
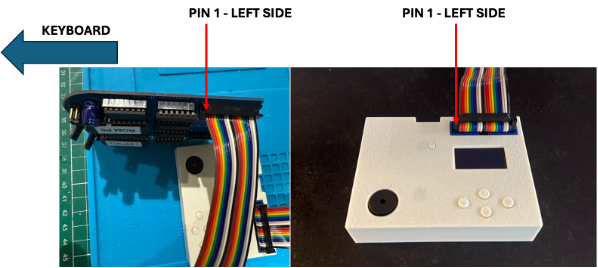
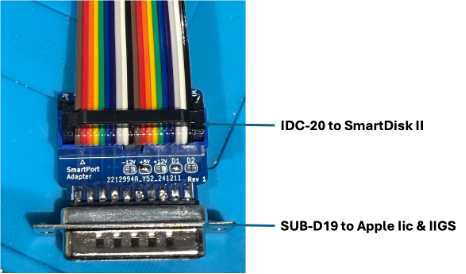
B/ IIc & IIGS
To connect the SmartDisk II to your IIc and IIGS, and adapter will be needed to convert SmartPort (SUB-D19) to IDC20. It is very hard to find a SUB-D19 as no-one is now using it.
This online shop have SUB-D19: http://iec.net/product/d-style-male-solder-type-connector/
An adapter to convert SUB-D19 and IDC20 is available on github: https://github.com/vibr77/SmartPortAdapter
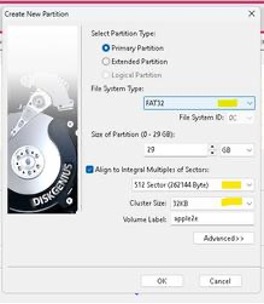
4 – Preparing the SDCard
The SDCard needs to be formatted using FAT32 with a specific sector size: 64 sectors of 512 Bytes per cluster. This is needed to ensure an optimal access to comply with Apple II timing requirement.
If SDCard formatting is not done with the right sector size (512 Bytes) then, reading image file on Apple II will give unpredictable behaviours.
Directly on the SmartDisk II: within the Menu Settings, formatting of the SD Card can be done
On Linux: formatting can be done on a terminal: mkfs.fat -F 32 -s64 [SDCARD /dev/sde as exemple]
On Windows: Tools like DiskGenius can perform the required formatting with cluster size 32Kb and 512 sectors
On Mac using a terminal: sudo newfs_msdos -F 32 -c 64 [diskXsY]
There is also an option in the configuration menu on the SmartDisk II to rightfully format the SDCard
5 – Update
Each SmartDisk II has a bootloader that enable easy firmware update. To enter the Bootloader mode, double click on the RESET button.
Process:
- Disconnect the SmartDisk from the Apple II
- Remove the SDCard
- Connect the SmartDisk on your PC using a USB Cable (be careful some cable are only Powercable and do not enable data transfer)
- DoubleClick on the Reset button on the SmartDisk II
- On the computer a new drive should have appeared
- Copy & Paste UF2 firmware update file available on github release
Warning: before updating to USB, unplug the SmartDisk II from the Apple II otherwise it may be damaged.
6 – Using the SmartDisk II
A/ User Interface
The User interface is composed of:
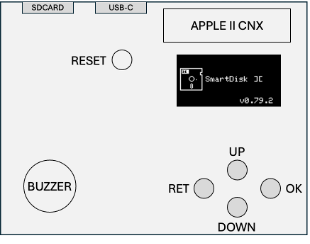
- 4 Navigation buttons
- RET: Return
- OK: execute selection
- UP: move selection up
- DOWN: move selection down
- 1 System reset button: perform a system reboot when a single click is done or activate DFU mode for firmware update when a double click is done.
- 1 OLED Screen
- 1 Buzzer
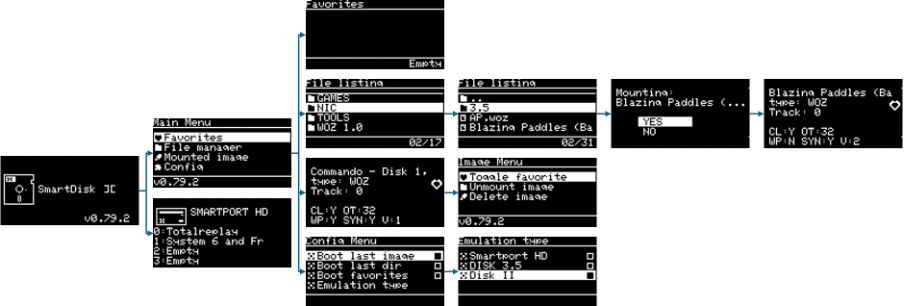
B/ SCREEN NAVIGATION
The overall screen navigation path from the splash Screen to mounted image is: