This guide walks you through setting up and using your SmartDisk II — from wiring it to your Apple II, through preparing the SD card, to navigating every on-screen menu. Keep it handy the first few times; after that it’s second nature.
Supported disk image formats
| Format | Read | Write |
|---|---|---|
| WOZ 2.0 | ✅ | ✅ |
| WOZ 1.0 | ✅ | — |
| DSK | ✅ | ✅ |
| PO | ✅ | ✅ |
| 2MG | ✅ | ✅ |
| NIC | ✅ | — |
1 · Safety precautions
A few habits will keep your SmartDisk II — and your Apple II — healthy:
- Never connect or disconnect the SmartDisk II while the Apple II is powered on. It can damage the board.
- Never insert or remove the SD card while the SmartDisk II is powered.
- Do not plug in USB while the SmartDisk II is connected to the Apple II.
- Always check the IDC ribbon connection on the Disk II controller before switching the Apple II on.
- Boards before hardware Rev 3 are not compatible with the IIc & IIGS without a small PCB modification.
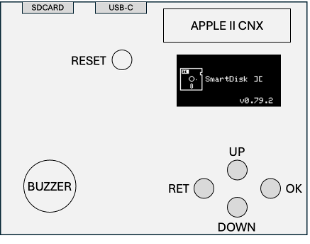
2 · Hardware at a glance
The SmartDisk II exposes everything you need on a single small board:
| Part | Purpose |
|---|---|
| IDC-20 connector | Connects to the Disk II controller (or to the SmartPort adapter for IIc/IIGS) |
| SD card slot | Holds your disk images |
| OLED display | 0.96″ screen showing the menus |
| 4 control buttons | UP, DOWN, OK and RET — menu navigation |
| Reset button | Single click reboots; double click enters firmware-update (DFU) mode |
| USB-C | Firmware updates only (use a data cable, not a charge-only one) |
| Buzzer | Audible feedback |
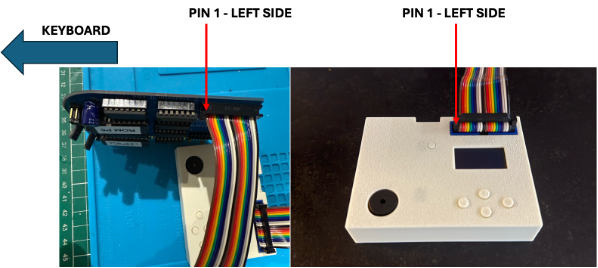
3 · Connecting to your Apple II
Apple II+ / IIe
You’ll need a Disk II controller card connected to your Disk II drive chain. The orientation of the 20-pin ribbon matters: pin 1 must be on the left side (the keyboard side). Use the ribbon’s coloured edge as a guide so the left side of the Disk II controller lines up with the left side of the SmartDisk II.
Apple IIc / IIGS
The IIc and IIGS use a SmartPort (SUB-D19) connector, so you’ll need an adapter that converts SUB-D19 ↔ IDC-20. SUB-D19 connectors are hard to find these days; an open-source adapter and sourcing notes are linked below.
- Adapter (open source): github.com/vibr77/SmartPortAdapter
- SUB-D19 connector source: iec.net
On the adapter, the IDC-20 side goes to the SmartDisk II and the SUB-D19 side goes to the Apple IIc / IIGS.
4 · Preparing the SD card
The SD card must be formatted FAT32 with 64 sectors of 512 bytes per cluster (32 KB clusters). This specific layout is what lets the SmartDisk II meet the Apple II’s strict timing.
Easiest — on the device: open Config → Make filesystem to format the card correctly right from the SmartDisk II.
On Linux:
mkfs.fat -F 32 -s 64 /dev/sdXOn macOS:
sudo newfs_msdos -F 32 -c 64 /dev/diskXsYOn Windows: a tool such as DiskGenius can create a FAT32 partition with 512-byte sectors and 32 KB clusters. (Windows’ built-in formatter does not produce the right layout.)
Tip: use a quality, known-brand card — many cheap cards have poor read/write rates and will cause trouble.
5 · Using the SmartDisk II
The controls
| Button | Action |
|---|---|
| UP | Move the selection up |
| DOWN | Move the selection down |
| OK | Select / open / mount |
| RET | Go back, or up one level (return to the main menu) |
A single click of the Reset button reboots the device; a double click enters firmware-update mode.
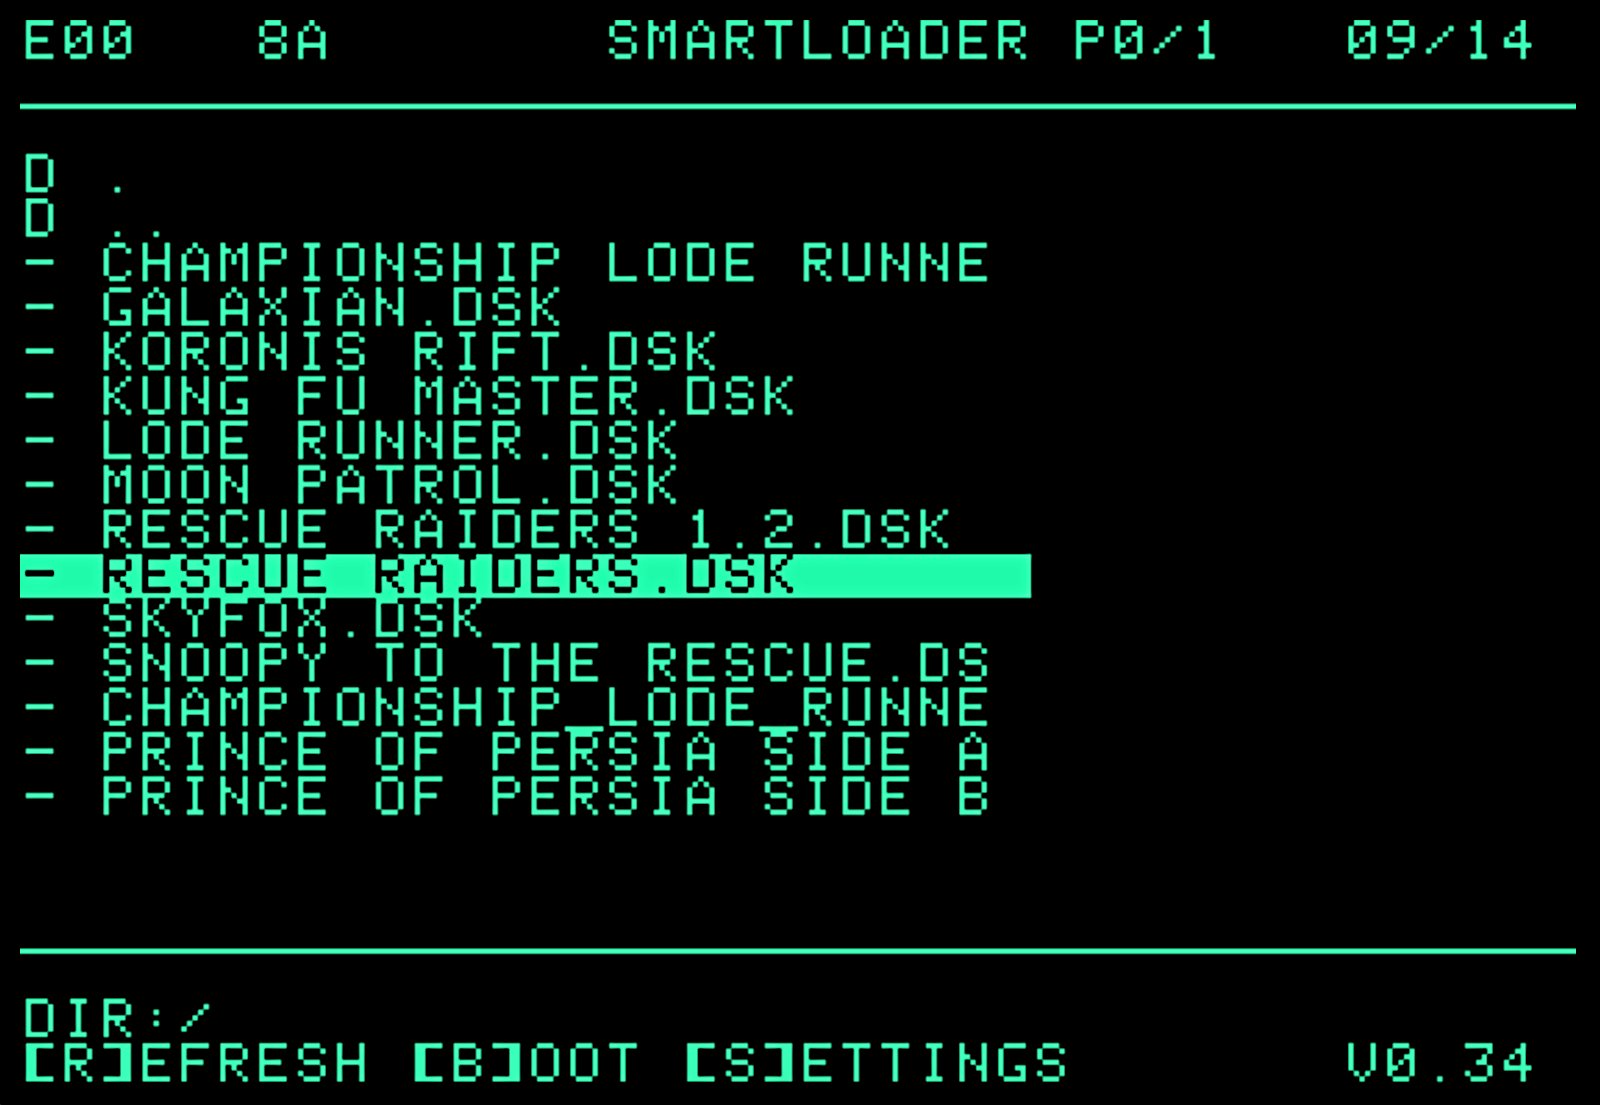
6 · Browse and boot from the Apple II (SmartLoader)
With SmartLoader, you don’t even need the SmartDisk II’s own buttons for everyday loading. It puts a fast green-screen browser on the Apple II itself: SmartLoader reads the disk images on your SD card and lists them right on screen, so you can scroll through your whole collection and boot any title straight from the Apple II.
- [B] — boot the highlighted disk
- [R] — refresh the listing
- [S] — settings
7 · The screens, one by one
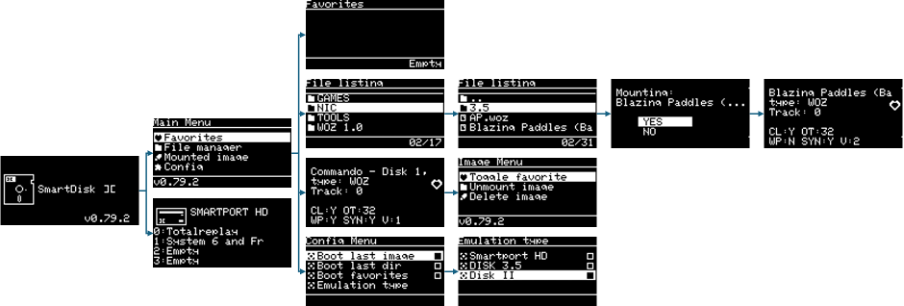
Splash screen
On power-up, the splash screen shows the current firmware version (bottom-right). After ~2 seconds it moves on to your last mounted image, the file manager, or the main menu — depending on your boot setting (see Config).
Main menu
The root screen. Press RET from anywhere to return here. The firmware version sits at the bottom-left.
■ File manager
▸ Mounted image
✱ Config
- Favorites — your starred images (Disk II emulation only)
- File manager — browse the SD card
- Mounted image — jump to the image currently loaded
- Config — settings
File manager
Browse the SD card. Folders are listed first, then image files with a supported extension (DSK, NIC, WOZ, PO). The item count for the current folder shows bottom-right.
▸ NIC
▸ TOOLS
WOZ 1.0
UP/DOWN to move, OK to enter a folder or mount an image, RET to go up a level.
Mounted image
After mounting, this screen shows the image’s live status:
Track: 0
CL:Y OT:32
WP:N SYN:Y V:2
| Indicator | Meaning |
|---|---|
| Track | Current head track (0–35) |
| ♥ | Image is in your favorites |
| CL | Weak bits cleared (Y/N) |
| OT | Optimal bit timing (32 × 0.125 ns) |
| WP | Write-protected (Y/N) |
| SYN | Synchronized track (Y/N) |
| V | WOZ version (1 or 2) |
Press OK to open the image options.
Image options
■ Unmount image
▸ Delete image
- Add / remove the image from favorites
- Unmount the current image
- Permanently delete the image from the SD card
SmartPort HD
When the emulation type is set to SmartPort HD, the SmartDisk II can hold up to four PO hard-disk images at once. The image that boots first is marked with a ★ instead of its index number; change the boot order in Config.
1: System 6 and Fr
2: Empty
3: Empty
Place the PO files at the root of the SD card using this naming, where [title] is the label shown on screen:
vol01_[title].PO
vol02_[title].PO
vol03_[title].PO
vol04_[title].PO
Config
☐ Boot last dir
☐ Boot favorites
Emulation type
| Setting | What it does |
|---|---|
| Boot last image | On power-up, auto-mount the last image used |
| Boot last dir | On power-up, open the file manager at the last folder |
| Boot favorites | On power-up, show the favorites list |
| Emulation type | Choose DISK II (5.25″), SmartPort HD, or UNIDISK 3.5 |
| Sound effect | Enable / disable the buzzer |
| Clear prefs | Reset the configuration |
| Clear favorites | Empty the favorites list |
| Make filesystem | Wipe the SD card and create a fresh FAT32 partition |
8 · Updating the firmware
The SmartDisk II ships with a bootloader for easy, drag-and-drop firmware updates over USB.
- Disconnect the SmartDisk II from the Apple II.
- Remove the SD card.
- Connect it to your computer with a USB data cable (some cables only carry power).
- Double-click the Reset button to enter bootloader mode.
- A new drive appears on your computer.
- Copy the latest .UF2 firmware (from the GitHub releases) onto that drive.
Resources & support
- Project & firmware releases — GitHub
- SmartPort adapter (IIc/IIGS) — GitHub
- Community & help — Discord
- Development thread — AppleFritter